
This blog offers an in-depth description on how to tile a wall, whether it be a bathroom wall, a kitchen wall or splashback this guide is all you need. Follow this for a DIY solution with professional results.
Materials Needed
Add these materials to your shopping list:
- Wall Tiles
- To find out how many tiles you need follow the simple equations:
- Length of Area x Width of Area = Number of Metres Squared
Metres Squared ÷ Pack Coverage = Number of Packs Required
TIP: Buy 10% extra for edges, breakages and cutting waste (allow 15% for herringbone patterns)
- Filler (in case you have any holes in the walls that need filling)
- Tile Adhesive –Products – Get the best price – In2tools UK
- Tile Spacers – Buy Here
- Sanitary Sealant – Buy Here
- Grout – Buy Here
- Multi-purpose Cloths – Buy Here
- Tile Trim
Tools Needed
You may find that you have a lot of these tools already in your toolbox if not follow our links to pick yourself up the right tools to give yourself the best chance at a professional finish.
- Ruler – Buy Here
- Tape Measure – Buy Here
- Chinagraph pencil or felt-tip pen (if required) – Buy Here
- Trowel – Buy Here
- Notched Trowel (aka a notched spreader) – Buy Here
- Tile Cutter – Buy Here
- Tile File (if required) – Buy Here
- Hacksaw (if required to cut the tile trim) – Buy Here
- Grout Spreader (aka grout float) – Buy Here
- Grout Finisher (aka grout shaper)
- Claw Hammer – Buy Here
- Sponge – Buy Here
- Mixing Bucket – Buy Here
- Spirit Level – Buy Here
- Cartridge Gun (if required- some sealant comes as a trigger gun and therefore does not require a cartridge gun) – Buy Here
- Sealant Smoother – Buy Here
- Masking Tape – Buy Here
- Drill with Ceramic/Masonry bit (if required) – Buy Here
- Gauge Rod (a spare piece of wood in which measurements can be marked upon)
Safety Kit Needed
With all DIY jobs safety is of high priority and tiling a wall is no different. Wear safety goggles, safety gloves and a dust mask to protect you lose fragments and sharp edges.
Planning and Preparation?

Good planning and preparation can be the difference between a successful job and a failed one.
Wall Preparation:
You must ensure that the surface you are tiling is sanded, cleaned and sealed. If you are tiling absorbent surfaces such as: new or bare plaster, timber or ply then to prevent the moisture in the tile adhesive from being absorbed too quickly by the wall it is advised that you use a PCA primer.
If you are tiling over wallpaper then you need to strip it back to the plaster and fil in any holes or cracks. Bear in mind that this new plaster must be dry before you start your tiling, this can take at least 2 months.
Materials like natural stone and some porcelain tiles may need to be sealed. We advise they you follow the manufacturer’s recommendations and apply the appropriate sealing solution before and after grouting.
Check the maximum weight in which your walls can support:
Gypsum plaster: these walls are good quality and can support a maximum weight of 20kg/m2m2, this wall type could support stone tiles with a 7mm thickness or ceramic tiles with an 8mm thickness. [Gypsum plaster is a white cementing material made by the partial or complete dehydration of the mineral gypsum. It is the main constituent in many forms of plaster and drywall]
Gypsum plasterboard direct: tiling directly onto plasterboard without any plaster skim is more stable meaning these walls can support a maximum weight on 32kg/m2m2. As a result of this increased stability these walls can support stone tiles with a thickness of 10mm and ceramic tiles with a thickness of 12mm.
- Wood-based sheets: this type can support up to 30kg/m2m2, this translates to the support of 8mm thick stone tiles (with adhesive) and 10mm thick ceramic tiles.
- Foam-cored tile backing boards: can support up to 60kg/m2m2.
- Fibre-cement boards: can also support up to 60kg/m2m2.
— the foam-cored tile backing and fibre-cement boards have the largest load bearing capacity.
- Gypsum fibre boards: can support between 35-40kg/m2m2. [Gypsum fibreboard is a reinforced material consisting of gypsum and cellulose fibres. These two raw materials are mixed and after the addition of water (no other binding agents) they are pressed under high pressure to form panel sheets]
- Glass reinforced cement-based boards: can support up to 50kg/m2m2.
- Creating your design:
- You need to measure out the dimensions of your tiling surface and your tile design, when measuring out the tile design always allow for grout gaps (typically for wall tiling these are 2-3mm).
- To measure your tiling surface, you should measure the height and width of each area with a tape measure, times your height and width together to get the number of square meters you will need. If the walls you are tiling is in an irregularly shaped room, then it is best to divide the area into different segments and work out the dimensions separately and then add the measurements together. Be sure to factor in any doors, windows or obstructions to do this measure their areas and subtract the dimensions off of the total.
- Plan out the best arrangement of your tiles, aim to have similar sized tiles in the corners of the walls for a better appearance. Make sure your tile design has a satisfying blend of colour, texture and pattern. If need be, you can mix tiles from separate packages.
- If you are tiling around any doors, windows or obstructions then be sure to factor this into your plan so tiles and grout lines can be symmetrically laid out.
- Using your measurements for height and width establish the middle of your space, then using a pencil or felt-tip mark out the vertical rows of your tiles.
- Lay out a line of tiles, remembering the grout space between them, then line up your gauge rod with the edge of your first tile and mark each tile and the gaps on the rod, it may be helpful to number your tiles to see how many you need in each row. Repeat this process for a secondary gauge rod.
TIP: when using adhesive, we recommend you work in small areas so that tiles are fixed before the adhesive starts to dry.
TIP: start tiling your grid in the centre of the wall, this way it is easier to maintain the symmetry of your pattern. Any half-tiles you may need can be used at the end of the rows.
Step-by-step

Step 1: Hold the gauge rod in line with the centre mark on your wall, mark the position of the tiles across.
Step 2: When you reach the corner check what the size of the last tile will need to be. If the size is less than a half of a tile then adjust your starting point, to do this make a new mark halfway between two tiles and use this as your new starting point. This should mean that the end tile will be more than half a tile wide and result in much better finished wall.
Step 3: Use a spirit level to draw a line from the top of the wall to the bottom of the wall at your starting point mark. Repeat this for every tile mark you have made.
Step 4: Now to create horizontal rows. Firstly, align your gauge rod at the starting mark along the vertical line and with the skirting board/floor, next mark out the position of the tiles along the vertical line until you reach the floor. Like before if the top tile gap is less than half a tile then adjust the position by making a mark halfway between your original wall marks.
Step 5: Align a mark on the gauge rod with your mark drawn on the wall and make another mark at the first whole tile above floor level.
Step 6: Mark a horizontal line across the wall using a spirit level.
Step 7: Check the wall for any cables and pipes, if clear align one gauge rod with the horizontal pencil line and the other gauge rod with the vertical line and screw them into the wall.
Step 8: If you are using a powder adhesive then follow the manufacturer’s instructions to prepare it.
TIP: make sure to choose a suitable tile adhesive for your chosen tiles: use a ready-mixed tile adhesive or powder adhesive for ceramic tiles and for porcelain tiles use a powder tile adhesive.
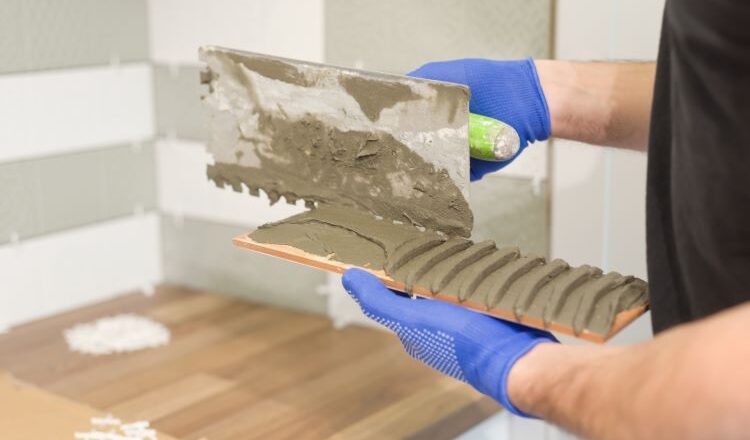
Step 9: Use the trowel to scoop up some adhesive, starting from the corner of the gauge rods press the adhesive onto the wall. Next holding the notched trowel at an angle of 45° spread the adhesive away from the corner with horizontal strokes. The ridges produced by the trowel will ensure there is an equal amount behind each tile.
TIP: if your chosen tiles are larger than 20 x 20, also apply adhesive of the back of the tiles.
Step 10: Apply the first tile into the corner where your rods meet and press the whole tile firmly against the wall. The add a tile to the side and above this first tile, leaving a gap between them, be sure to push all tiles firmly into the adhesive with a twisting motion.
TIP: As you go wipe off any adhesive from the tiles as once dried the adhesive can be very difficult to remove.
Step 11: Add your tile spacers into the corners between the tiles and adjust tile position accordingly. Push your spacer in firmly to make for an even grout.
Step 12: Continue to add tiles until you have tiled the area covered by the adhesive. Apply more adhesive and tiles until you have fitted all of you whole tiles.
TIP: Use a spirit level regularly to ensure all tiles placed are flat and level.
Step 13: Allow for the adhesive to dry, following manufacturer’s guidelines, and then remove the rods using the claw hammer.
Step 14: Now for tiling corners and cutting tiles to size. To measure and mark a tile for cutting hold the tile that you will be cutting over the last whole tile of the row. Then place another tile against the wall and mark where it overlaps with a tile scribe and rule. The other way to measure and mark the tiles for cutting is measure the gap between the tile edge and the corner, allowing for grout spacers, then mark this distance against the tile you are cutting.
Step 15: Use the tile cutter to cut the tiles to size following the marks you have made, place a pencil underneath the score line and apply downward pressure in order to snap the tile. If the tile needs adjusting you can use the tile file.
- How to tile internal corners:
Step 1: If you are going to tile the adjacent wall then you don’t need to be 100% accurate, do allow enough room in the corner for grout if you are only tiling one wall.
Step 2: Using the narrow end of your notched spreader put adhesive on the back of the cut tile and press the tile in to place on the wall. If needed use joint spacers to keep the gaps.
Step 3: After finishing the first wall, move onto the next one. You can ignore this step if you are only tiling one wall.
- How to tile external corners:
TIP: Use tile trims on external corner in order to get neat finish and tile protection.
Step 1: Using a tape measure, measure the length of the edge in which you are fixing the trim to and mark this length on your trim. Use a hacksaw to cut your corner trims, apply adhesive to the wall and press the trim in with a notched trowel.
Step 2: Line up the trim with the tiles on the first wall. At the top and bottom of the tile between the trim put a spacer in to allow space for the grout.
Step 3: Repeat the process from the first wall, working from the corner out leaving room for grout.
Step 16: Take a small amount of grout and apply to the tiles with a grout spreader, make sure to work it into the joints using long diagonal strokes.
Step 17: As soon as you have finished applying the grout go over the tile using a damp sponge. Be careful not to drag out any grout from the joints.
Step 18: Leave the grout to dry.
- How to seal around the edge of tiling

Step 1: If needed put the sealant into a cartridge gun, if not attach the nozzle and cut off the tip.
Step 2: Place a continuous band of sealant from one end of the tiles to another keeping constant pressure on the trigger of the gun.
Step 3: Using the sealant smoother smooth out any irregularities in the sealant and then leave to dry.