
Laying underlay correctly is absolutely vital in order to get the best possible finish for your new flooring, it makes the flooring easier to fit, protects the flooring from moisture and will massively improve comfort and sound and heat insulation.

Materials Needed:
- Underlay – Buy Here
Tools Needed:
Preparation:
The type of underlay you put down will depend on your sub-floor, for a concrete sub floor you can either lay an underlay combined with a damp-proof membrane or lay the two separately. However, for a wooden or plywood sub-floor you only need to lay a layer of underlay.
There are multiple underlay options suitable for both concrete and wooden/plywood sub-floors: foam underlay and fibreboard underlay. Foam underlay features an integrated damp-proof membrane whereas the fibreboard underlay does not, so keep this in mind if you are working on a concrete sub-floor.
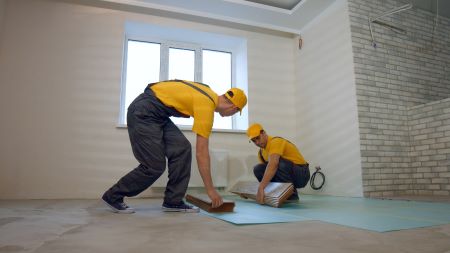
The Laying Process:
How to lay foam underlay:
Foam underlay can come as individual tiles that slot together, long lengths folded into a concertina or as a roll of underlay.
Installing an underlay roll:
Step 1:
Position the roll at one side of the room and roll it out until it reaches the other side.
Step 2:
Cut the roll to size using a straight edge and a utility knife. Repeat this process to lay each roll in the same way. Keep the rows as close together as possible.
Step 3:
Once you have completely covered the sub-floor with the underlay, apply waterproof tape along the joints between rolls.
Installing individual tiles or long lengths:
Step 1:
Start unfolding the underlay/slotting tiles together running in one direction from the point at which you plan to begin laying your flooring.
Step 2:
Add more lengths where needed until you reach a wall, using a utility knife and a straight edge trim the underlay to fit. Tape any joints between lengths of underlay with waterproof tape.
Step 3:
Begin laying the next row of underlay side and side again until reaching the far wall and cut to size. Ensure the rows sit side by side but do not at any point overlap. Tape the joints between the rows with waterproof tape.
Step 4:
Repeat this process until the whole floor is covered by underlay.
If pipes are rising out of the sub-floor, possibly to the radiator, you may need to use a utility knife or scissors to cut around these. We recommend that you leave a 10mm gap between the underlay and the pipe.
How to lay damp-proof membrane:
You will need to lay a damp-proof membrane down first if you are laying fibreboard underlay onto a concrete floor.
Step 1:
Start in the furthest corner from the door and lay the membrane across the floor.
Run the damp-proof membrane up to the wall so that it fills the gap between the floor and the base of the skirting boards. If the room hasn’t got skirting boards already installed then allow the membrane to run approximately 50mm up the wall.
Step 2:
If more than one sheet of membrane is needed then we recommend to join the sheets together using waterproof tape across the long edge. Any excess membrane can be trimmed using a utility knife and a straight edge.
If one sheet of membrane is more than sufficient then the membrane will need trimming around the edge of the room, as above use a utility knife and a straight edge to do any trimming.
How to lay fibre-board underlay:
It is important to note that fibreboards need to be laid at a 90° angle to the direction in which the flooring will be laid.
TIP: work out how the flooring will be laid before you begin to ensure that the underlay will run at a 90°.
Step 1:
Lay the boards starting from the wall adjacent to where you plan to begin laying your flooring so that the underlay will be at a 90° angle. Leave a 2mm gap between each board as well as a 10mm gap between the underlay and the edge of the room. In order to make a stronger and more secure base stagger the boards in the image of a brick pattern.
Step 2:
To achieve the brick like pattern and stagger the boards you will need to trim some boards. We recommend using a utility knife and a straight edge to make your cuts. Continue laying the boards until the whole sub-floor is covered in underlay.
Jump to our related blog on How to Lay Laminate Flooring: a Step-by-Step Guide – click here
Jump to our related blog on Preparing Your Sub-Floor: – click here