
When replacing your flooring the sub-floor is just as important to the end finish as the new flooring in which you are putting down. Any defects in your sub-flooring will likely show through and mar the look of your new floor.
Examine the sub-floor for an inconsistences or damage, if you find that your sub-floor is uneven then you will need to level it out whether it be a wooden or concrete floor.
How to level a wood floor:
Materials needed:
- Wooden Batten
- Hardboard (3mm thickness recommended)
Tools needed:
- Hammer – Buy Here
- Nails – Buy Here
- Belt or Orbital Sander (if floor boards need smoothing) – Buy Here
- Spray Bottle – Buy Here
- Scrubber – Buy Here
Preparation:
Relace any rotten or broken floorboards before adding hardboard sheets, this is stopping the future issue of instability of the floor.
Any loose or creaking floorboards will need to be either screwed down or replaced, use a pipe or cable detector when putting screws in to determine if pipes or cables are causing the problem and potentially stopping if from being fixed. Any protruding nails or screws should be nailed down further to below the surface. It may be that you need to smooth down uneven floorboards that has become slightly raised, if so, use a sander and be sure to wear a mask while working.
We recommend that you use 3mm thick hardboard sheets to level the flooring, the sheets need to be properly conditioned before fitting. This can be done by spraying and scrubbing water over the rough side of the sheet and leaving them laid flat in the room in which they are to be laid for 48 hours in order for the hardboard to acclimatise. This gives the hardboard time to expand, dry and then tighten before they have been laid this helps to prevent any uneven joints forming once laid.
For self-adhesive and loose laid flooring, you should lay your hardboard sheets with the smooth side up, for coverings that are to be stuck down using adhesive then rough side up is best.
The Laying Process:

Step 1:
Start laying the boards down in the centre of the room ensuring that the long side is at a 90° angle to the floorboards. Each sheet needs to be fixed down using nails, these nails should have a maximum spacing of 150mm with nails placed at the end of the sheet being no more than 15mm from the edge.
TIP: to maintain the 150mm spacing a wood batten can be cut to size in order to use as a guide.
Step 2:
Nail along the long side of the sheet first and work diagonally towards the opposite-corners in a pyramid fashion.
Step 3:
Put the other sheets down in place and again nail down the boards starting with the long side and working diagonally towards the opposite corners in a pyramid fashion. Make sure that when putting down the sheets you stagger them in the image of a brick wall.
Step 4:
When you reach the end of a row you will have to cut your sheet to size, to do this simply measure the remaining distance and mark it onto your designated sheet and cut to size. Use the remaining cut off from the last sheet to begin your next row, this is to reduce wastage and ensure you have enough materials to complete the job.
When laying this hardboard, you need to take into account that this may raise the overall level of the flooring, you may need to adjust your door for it to sit flush. Take into account that when you lay your
How to level a concrete floor:

Materials needed:
- Degreasing product
- Levelling compound
- Concrete repair compound
- PVA or acrylic primer
Tools needed:
- Spray bottle –Buy Here
- Sweeping brush
- Spirit level – Buy Here
- Metal rule – Buy Here
- Paintbrush – Buy Here
- Plasterer’s trowel – Buy Here
- Wooden batten
- Flat scrapper – Buy Here
Safety Kit:
The Laying Process:
Step 1:
To start dampen the floor with the water spray bottle and use the brush to sweep away any dirt or dust. If you find grease on the surface clean it using the degreasing prodcut.
Step 2:
Check the floor for any repair work that needs doing, you may find that there are holes or cracks that go deeper than the manufacturer recommends for the use of the floor levelling compound. If so, you may need to use a concrete repair compound to fill these holes or cracks.
Step 3:
Seal the surface using a diluted PVA adhesive mix or a suitable acrylic primer with a paintbrush, remember to give your adhesive time to dry.
Step 4:
You now need to work out how much levelling compound you will need. To do this you will have to find out how deep the holes are by placing a spirit level across the floor and measure from the bottom of the level to the deepest section of the dip. We recommend that you use a metal rule as opposed to a tape measure for increased accuracy and ease of use.
Step 5:
Check if the floor is sloped, if so then the flooring will require different amounts of levelling compound applied in different parts of the room. To know how much levelling compound you will need, you need to find out the average thickness. Combine this average thickness with the area of the room and refer to the manufacturer’s coverage guidance.
Step 6:
Follow the manufacturer’s instructions to mix the compound to the right consistency.
TIP: wear overalls and rubber gloves to protect your clothes and skin.
TIP: mix the compound outside if you can and cover the area with protective sheeting.
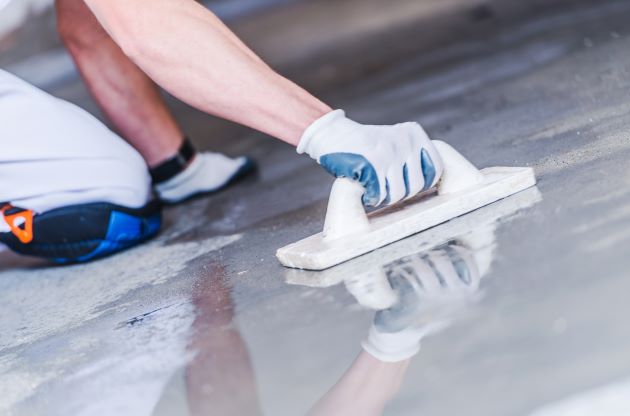
Step 7:
Start pouring the compound in the corner furthest from the door, use the plasterer’s trowel to spread out the compound to the required thickness maintaining long, sweeping strokes. Try to work quickly and carefully as the compound will set in approximately 15 mins. We recommend completely the spreading in one go as once it hardens it will become very hard to spread.
TIP: To stop the compound from running into another room fix a temporary wooden batten with nails to the edge of your work area.
Step 8:
It’s time now to leave it to dry, this should take approximately 30 mins but always check the manufacturers guidance on drying times.
Concrete sub-floor
Check that the concrete is dry, if it has just been laid or levelled then allow for one day of drying time for every millimetre in depth of concrete. Using a moisture meter check that the concrete surface is dry. ‘Dry’ is where the moisture content of the floor is no more than 2 to 3%.
If you don’t own a moisture meter you can test for damp in other ways. One way is to tape a sheet of polythene to the floor and leave it overnight. Then in the morning check for any discoloration of the concrete underneath the sheet and for any condensation or water droplets on the underside of the polythene sheet put down. If you find any damp then this needs to be treated before you lay the underlay down.
Wooden sub-floor:
Check for any loose floorboards and securely screw or nail them down if needed. Make sure there are no raised nails in the floorboards if so, use a hammer to drop them down so they are flush with the floorboards.
Jump to our related blog on How to Lay Laminate Flooring: a Step-by-Step Guide – click here
Jump to our related blog on How to Lay Underlay: a Step-by-Step Guide: – click here